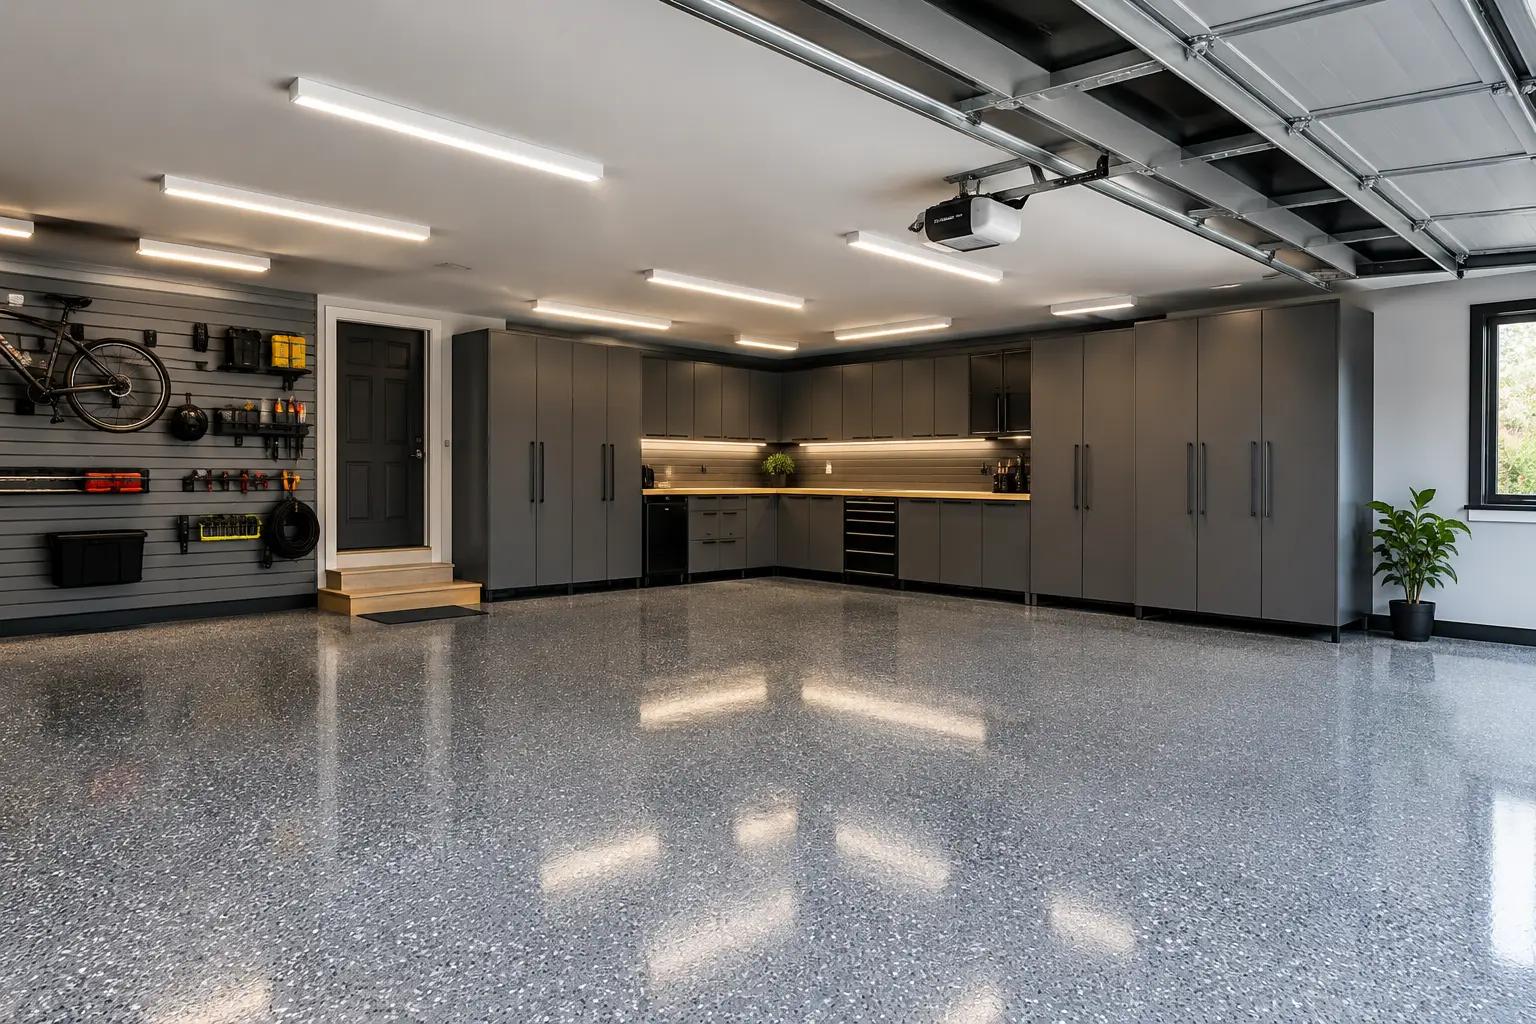
A garage can have exceptional cabinetry, durable flooring, and thoughtfully planned storage, yet still feel unfinished when the lighting falls short. Effective garage lighting design changes how the room performs from the moment you pull in. It makes parking easier, turns a workbench into a usable workspace, helps you find what you need quickly, and gives a custom garage the refined finish it deserves.
For homeowners investing in a complete garage transformation, lighting should be considered early, alongside storage layout, wall systems, flooring, and power needs. It is not simply a matter of adding brighter bulbs. The best results come from planning layered light around how your household actually uses the space.
Start With the Way You Use the Garage
A garage that only shelters vehicles needs a different approach than one that also stores sports equipment, supports weekend projects, houses a home gym, or functions as the family’s daily entry point. Before selecting fixtures, consider where people walk, where doors open, where vehicles park, and which areas require close visual attention.
For example, a homeowner who uses a workbench for detailed repairs needs direct, shadow-free task lighting. A family that enters through the garage several times a day benefits from bright, welcoming illumination near the interior door, storage lockers, and pathways. If seasonal bins and tools are stored overhead, lighting must reach upward as well as across the floor.
This is where a tailored plan matters. A fixture that looks sufficient on paper can leave the areas beneath cabinets, shelving, or a raised vehicle hatch unexpectedly dim. Designing around the room’s real functions creates a garage that feels calm, capable, and easy to maintain.
Build Garage Lighting Design in Layers
The most successful garage lighting design uses more than one light source. Each layer has a distinct purpose, and together they eliminate the harsh contrast and inconvenient shadows common in basic garages.
Ambient light creates an even foundation
Ambient lighting is the overall illumination that lets you park, walk, sort, and move around the room safely. LED ceiling fixtures are often the practical choice because they provide strong output with lower energy use and a long service life.
Linear LED fixtures work especially well in garages because their shape spreads light across a broad area. They can be arranged in rows that follow the direction of vehicle bays, creating consistent illumination from the garage door to the back wall. This layout often feels more intentional than placing a single fixture in the center of each bay.
The exact number of fixtures depends on ceiling height, wall color, vehicle count, and how much light the fixtures produce. A high ceiling, dark cabinetry, or a deep three-car garage may require more output than a compact, light-colored two-car space. The goal is even coverage, not a few intensely bright spots surrounded by shadow.
Task lighting supports detailed work
Task lighting belongs where precision matters. Under-cabinet lights, adjustable work lights, or dedicated fixtures above a workbench make it easier to read labels, handle small parts, charge tools, and complete projects without straining your eyes.
This layer is particularly valuable when tall steel cabinets or wall storage sit near a workstation. Overhead lighting alone can cast your body’s shadow directly onto the work surface. A focused fixture placed in front of the work area solves that problem and makes the space far more useful.
Task lighting should be bright without producing glare on glossy surfaces, metal tools, or screens. Diffused LED fixtures are often more comfortable for long periods of use than a bare, exposed source of light.
Accent lighting adds polish and orientation
Accent lighting is optional, but it can elevate a premium garage from highly functional to genuinely inviting. It may highlight a display shelf, illuminate a feature wall, or add a subtle glow beneath floating cabinetry. In a garage that serves as an extension of the home, these details help create a space that feels considered rather than purely utilitarian.
Accent lighting should never replace practical illumination. Think of it as the finishing layer: the element that reinforces the design once safety, visibility, and work needs are already covered.
Choose the Right Brightness and Color Temperature
Light output is measured in lumens, not watts. When comparing LED fixtures, focus on lumens because they tell you how much visible light a fixture provides. A garage used for storage and parking may need moderate ambient illumination, while a garage with a workshop, hobby area, or extensive organization system benefits from a brighter plan.
Color temperature matters just as much. It is measured in Kelvin and affects whether light appears warm or cool. For most garages, a neutral to cool white range of roughly 4000K to 5000K works well. It provides a clean, clear appearance that helps distinguish colors, read labels, and see dust or debris on the floor.
Very warm lighting can make a garage feel softer, but it may look yellow and reduce visual clarity. Extremely cool lighting can feel stark in a space that is also used as a household entry. The best choice depends on the home’s broader design palette and how the garage is used.
For work areas, look for fixtures with a high color rendering index, often called CRI. A CRI of 80 is generally suitable, while 90 or higher offers more accurate color perception. That can be helpful when matching paint, inspecting automotive finishes, or identifying wires and hardware.
Plan Fixture Placement Around Storage and Vehicles
Ceiling lighting should not be planned independently from the rest of the garage. Tall cabinets can block light from reaching lower storage zones, and overhead racks can create dark areas below. A thoughtful layout places fixtures between major storage elements where possible, rather than directly above them.
Vehicle placement also deserves attention. A fixture positioned directly above a car may create reflections on the windshield while leaving the space beside the car dim. Rows of fixtures placed along the sides of vehicle bays can provide better visibility when loading groceries, opening doors, or checking a tire.
Avoid relying on the garage-door opener light as a primary source. It is useful for brief entry and exit, but it is not designed to provide balanced illumination throughout the room. A dedicated lighting plan is safer and more comfortable, especially when the garage is used after dark.
Make Controls Simple and Flexible
Lighting should respond to daily routines without becoming complicated. Separate switches for ambient, task, and accent lighting allow you to use only what you need. This approach can reduce energy use while giving the room more flexibility.
Motion sensors are useful near the entry door, in storage-heavy zones, or for households that frequently arrive with full hands. Timers can be helpful in workshops, though they should be selected carefully so they do not leave someone working in the dark. Dimmers are another worthwhile option, particularly if the garage also functions as a hobby space or entertaining overflow area.
Smart controls can add convenience, but they are not essential for every project. A well-placed switch and a sensible zoning plan often deliver the most reliable day-to-day experience. The right solution depends on how much automation genuinely simplifies life for your household.
Consider How Surfaces Reflect Light
Lighting and finishes work together. Light-colored walls, bright ceilings, and a clean floor surface reflect illumination and help the room feel larger. Dark cabinetry can look sophisticated, but it absorbs more light, making even fixture placement more important.
A professionally finished floor can also support the overall effect. A full-flake polyaspartic floor coating provides a clean, light-reflective surface while remaining durable, slip-resistant, and easy to maintain. Its visual impact is not only about appearance. A floor that reflects light more evenly can make parking, cleaning, and locating dropped items easier.
When planning a complete garage renovation, viewing lighting, storage, and finishes together prevents costly adjustments later. It also ensures each choice contributes to a space that feels cohesive from every angle.
Bring the Plan Together Before Installation
The most polished garages are designed as complete environments, not assembled one decision at a time. A 3D design presentation can help homeowners visualize cabinet heights, parking clearance, work zones, and lighting placement before installation begins. That clarity is especially valuable when electrical changes, ceiling storage, or new work areas are part of the project.
Orga Spaces approaches garage transformations with this full-room perspective, helping homeowners create organized, visually refined spaces that support everyday life. The result is not simply a brighter garage. It is a room where arriving home, finding what you need, and getting started on the next task feels noticeably easier.
A well-lit garage gives every other upgrade room to shine. Choose lighting that supports the way you live, respects the details of the design, and makes the space feel ready for whatever the day brings.